NodeBB is a nodejs based modern style forum system that uses MongoDB as a database and can also work with the Redis database. Installation of nodeBB requires a VPS or dedicated server with root access. It can not be installed on the conventional cPanel based hosting. If you don’t already have a VPS then try digitalocean by clicking on this link and you will get 10$ free credit for playing around.
For installing nodeBB with Nginx reverse proxy you will need to install these components:
- NodeJS
- MongoDB
- Git
- NodeBB forum software
- Nginx
We will install them one by one by configuring each one along the way.
For this tutorial, I will be using digitalocean’s 1 GB droplet at their Bangalore datacenter.
1. Installing NodeJS:
At this time the nodeBB team suggests we should install nodejs version 8 for nodeBB. Use these commands to install it
curl -sL https://deb.nodesource.com/setup_8.x | sudo -E bash -

sudo apt-get install -y nodejs
After installing verify your nodejs and npm version:
node -v
npm -v
You will get output like this:
2. Installing MongoDB:
We will be installing MongoDB version 3.6 in this tutorial. Use these steps to install:
2.1: Import public key:
sudo apt-key adv --keyserver hkp://keyserver.ubuntu.com:80 --recv 2930ADAE8CAF5059EE73BB4B58712A2291FA4AD5
2.2: Create a list file for MongoDB:
echo "deb [ arch=amd64,arm64 ] https://repo.mongodb.org/apt/ubuntu xenial/mongodb-org/3.6 multiverse" | sudo tee /etc/apt/sources.list.d/mongodb-org-3.6.list
2.3: Reload local package database:
sudo apt-get update
2.4: Install MongoDB packages:
sudo apt-get install -y mongodb-org
Verify MongoDB version:
mongod --version
You will get output like this: 
2.5: Configure MongoDB:
2.5.1: Open mongo shell:
mongo
only if it fails to open shell then try this command and try the above command again to enter shell:
sudo service mongod restart
2.5.2: Switch to the built-in admin database:
use admin2.5.3: Creating users and setting passwords:
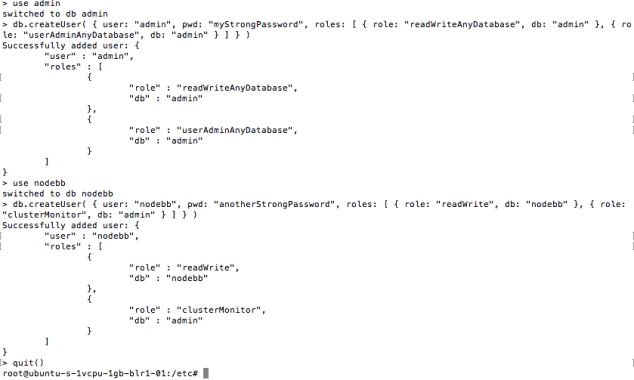
Here we will create an administrative user for MongoDB, create a new database for nodeBB and create another user for this newly created database
2.5.3.1: Create an administrative user by using this command:
db.createUser( { user: "admin", pwd: "<Enter a secure password>", roles: [ { role: "readWriteAnyDatabase", db: "admin" }, { role: "userAdminAnyDatabase", db: "admin" } ] } )*replace <Enter a secure password> with your chosen password.
2.5.3.2: Create new database for nodeBB by using this command:
use nodebbNow create user and password for this new database. This will be used to install nodebb.
db.createUser( { user: "nodebb", pwd: "<Enter a secure password>", roles: [ { role: "readWrite", db: "nodebb" }, { role: "clusterMonitor", db: "admin" } ] } )*again replace <Enter a secure password> with your chosen password.
2.5.4: Exit mongo shell:
quit()The screen should look like this:
2.5.5: Enable database authorization in the MongoDB configuration file:
Edit MongoDB config file by using nano:
nano /etc/mongod.conf
Move the cursor to the bottom of the file and paste these lines:
security:
    authorization: enabled
remember indentation in configuration files matter. If indentations are the wrong MongoDB will fail to restart.
Your screen should look like this:
Now
press ctrl + O then enter to save
press ctrl + X to exit nano
2.5.6: Restart MongoDB
sudo systemctl restart mongod
2.5.7: Verify the administrative user created earlier can connect:
mongo -u admin -p your_password --authenticationDatabase=admin
if everything is good you will see a screen like this:
Quit MongoDB shell by using
quit()
3. Install Git:
This is a short and simple step. Just run this command:
sudo apt-get install -y git
There are chances git is already installed on your system. In either case move to the next step.
4. Install NodeBB:
Make a directory for web content:
mkdir /var/www
Go to the newly created directory by using:
cd /var/www
Clone nodeBB in this directory by this command:
git clone -b v1.9.3 https://github.com/NodeBB/NodeBB.git nodebb*replace v1.9.3 with the latest version listed here.
Enter NodeBB directory with
cd nodebb
Initiate the installation by using this command:
./nodebb setup
This will install modules from npm and then enter the setup utility.
You will be asked a few questions regarding the database and the username password. Most of the default options will do. You will need to enter the username and password we set in step 2.5.3.2 that is the name of the username and password for the nodebb database we created.
After the database setup, it will ask for the credentials for the admin user for the new forum.
Don’t get confused. Your setup screen will look like this. I have marked the places where you will need to enter information with arrows. For the rest of the places just hit enter.
This will install the NodeBB.
Now start NodeBB by this command:
./nodebb start
Now you can view your freshly installed nodeBB forum in the browser by going to address:
http://your.server.ip.address:4567*Replace the red text with your server’s IP address.
Here 4567 is the port number.
You will see your new forum like this:
5. Installing Nginx
In this step, we will install the Nginx web server and configure it so that you can access the forum using your domain name.
5.1: Add Nginx repository:
sudo add-apt-repository ppa:nginx/stable
Hit enter when it asks.
5.2: Update the local package database and install Nginx:
sudo apt-get update
sudo apt-get install -y nginx
Nginx is now installed. Verify it by using the command:
nginx -v
it will give something like this:
Start Nginx by using this command:
sudo systemctl start nginx
5.3: Configure Nginx:
Go to Nginx sites-available directory
cd /etc/nginx/sites-availablecreate a new configuration file using this command:
sudo nano forum.example.com*Change forum.example.com with your domain name.
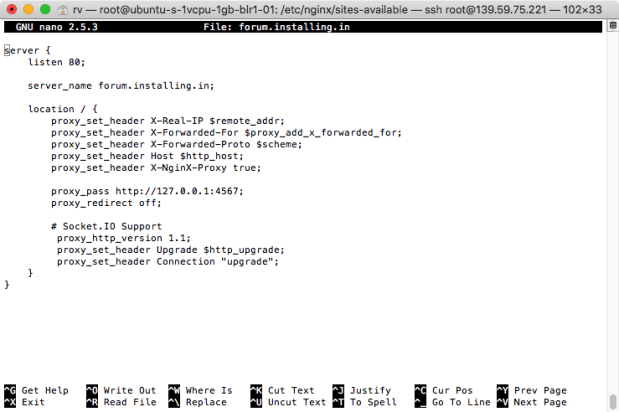
Paste this configuration
server {
    listen 80;

    server_name forum.example.com;

    location / {
        proxy_set_header X-Real-IP $remote_addr;
        proxy_set_header X-Forwarded-For $proxy_add_x_forwarded_for;
        proxy_set_header X-Forwarded-Proto $scheme;
        proxy_set_header Host $http_host;
        proxy_set_header X-NginX-Proxy true;

        proxy_pass http://127.0.0.1:4567;
        proxy_redirect off;

        # Socket.IO Support
         proxy_http_version 1.1;
         proxy_set_header Upgrade $http_upgrade;
         proxy_set_header Connection "upgrade";
    }
}*Again change the forum.example.com with your domain name. Your configuration file should look like this:
press ctrl + O then enter to save
press ctrl + X to exit nano
Now enter this command to go to sites-enabled directory:
cd ../sites-enablednow link the configuration file from here:
sudo ln -s ../sites-available/forum.example.comReload Nginx by this:
sudo systemctl reload nginx
Now you can see your forum by entering your domain in a browser.
Just one last little thing to do to fix frequent disconnection error.
Go to nodebb directory:
cd /var/www/nodebb
Open config.json in nano
nano config.json
Change the localhost:4567 with your domain name. It should look like this:
Enter your domain name where I have put http://forum.installing.in. Do not delete the parentheses(“”)
press ctrl + O then enter to save
press ctrl + X to exit nano
restart nodeBB by:
./nodebb restart
If all went well you will now have a fully functional ubuntu + nodeBB + Nginx setup. Visit your forum by entering your domain in a browser and you can log in as administrator by using the username password we set in the setup process.
Enjoy your new nodeBB forum 🙂
If you have any questions do let me know in the comments below.


